Regular DIY oil changes should be a top priority for any vehicle owner as they are essential maintenance procedures crucial for the proper functionality and long-term health of your engine. It’s important to understand that sticking to a consistent oil change schedule significantly enhances the overall longevity of your engine.
Although it may seem intimidating at first, deciding to take on the responsibility of performing DIY oil changes can yield substantial savings in the future, benefiting you financially and in terms of time management. By choosing to tackle oil changes independently, you are pushing yourself to actively maintain your engine, leading to improved performance, durability, and reliability in the long run.
This proactive approach not only keeps your engine running smoothly but also ensures it operates efficiently and reliably. To simplify the task of changing your car’s oil and make it more manageable, this comprehensive guide will provide detailed, user-friendly instructions with clear explanations and helpful visuals, equipping you with the knowledge and confidence needed to successfully carry out this essential maintenance task at your convenience. With this resource at your disposal, you will have the necessary info to execute oil changes effectively and maintain your vehicle in good condition for years to come.
Step 1
Gather your materials and tools before you begin, gather the followings:
- New oil filter
- Engine oil (check your owner’s manual for the recommended type and viscosity)
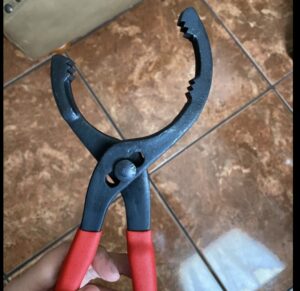
- Oil filter wrench
- Oil drain pan
- Funnel
- Socket wrench set
- Jack and jack stands (if necessary)
- Shop towels or rags
- Safety gloves and goggles
- Wheel chocks
Step 2
When preparing your car, it’s crucial to park it on a flat surface to ensure stability and safety. Give the engine a few minutes to cool down, especially if it has been running, as the high temperature of the engine oil can pose a burn risk.
To further enhance safety, make sure to engage the parking brake securely and add wheel chocks to prevent any accidental movement while you work on or around the vehicle. Taking these precautionary steps will help create a secure environment for any maintenance you need to perform on your car.
Step 3
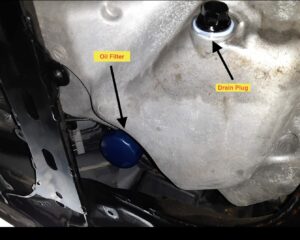
To begin the process of changing the oil, it is essential to first pinpoint the precise locations of two crucial components: the oil drain plug and the oil filter.

These components are vital for a successful oil change, and your car’s owner’s manual will offer valuable guidance in locating them, or simply check online.
When performing an oil change, typically, the oil drain plug can be found at the base of the engine oil pan, whereas the oil filter is usually attached to the engine block itself. When you have determined their locations, remember to equip yourself with a socket wrench to effectively loosen the oil drain plug. Make sure that you position a suitable oil drain pan underneath the plug as it will help prevent spillage and efficiently collect the used oil.
Step 4
To drain the old oil effectively, it is important to handle the process carefully. Begin by gently loosening and removing the oil drain plug, making sure to do so with precision to avoid any spillage. Allow the old oil to flow out completely into the designated oil drain pan.
The placement of the pan directly beneath the drain plug is crucial in ensuring that all the oil is collected without any wastage. Once the oil has fully drained, take the time to clean the drain plug thoroughly before securely reinstalling it back in place. This approach guarantees a clean and efficient oil changing procedure.
Step 5

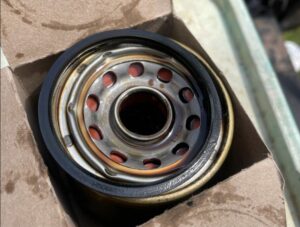
To replace the oil filter, start by using an oil filter wrench to carefully loosen and remove the old oil filter from the engine block, being mindful of potential oil spillage during this step. Make sure to have some rags or absorbent material on hand to catch any oil that may leak out.

When it’s time to install the new oil filter, remember to apply a small amount of clean oil to the rubber gasket to create a secure seal that prevents leaks. Once the rubber gasket is lubricated, hand-tighten the new oil filter onto the engine block, exerting just the right amount of pressure to ensure a snug fit without over-tightening, which could lead to complications during removal in the future.
Step 6

As you prepare to add new oil to your vehicle, make sure to have a funnel on hand for a cleaner and more precise pour. Take your time and pour the recommended quantity of fresh engine oil into the designated filler hole, paying close attention to the specifications outlined in your car’s owner’s manual regarding both the oil capacity and viscosity required for optimal performance.
Monitor the oil level as you pour, using the dipstick to gauge when it reaches the full mark. Once you have achieved the correct oil level, securely replace the oil filler cap to prevent any leaks or spills.
Step 7
After completing the oil change process, the next crucial step is to ensure that there are no leaks that could potentially cause damage. This involves running the engine for a few minutes to allow the new oil to circulate effectively throughout the system. Once the engine has ran, it is important to inspect underneath the car carefully for any indications of leaks near the oil drain plug and oil filter area.

This visual inspection is vital for detecting any potential issues early on, which can prevent further complications and maintain optimal engine performance. If no leaks are found and everything appears to be in order, the next step is to turn off the engine and perform a thorough cleanup. Using shop towels or rags, any spilled oil should be carefully wiped up to avoid any safety hazards and to maintain a clean environment.
Conclusion
Changing oil in your car is a straightforward maintenance task that can be completed in just a few simple steps. By following this comprehensive guide, you can save time and money by performing this essential maintenance task yourself. Taking the initiative to conduct regular oil changes not only enhances the longevity of your vehicle but also contributes to optimal engine performance. Keeping your engine well-oiled and maintained will ensure that it continues to run smoothly and efficiently, offering you years of reliable service and reducing the risk of unexpected breakdowns or costly repairs in the future.

